KeyShare Extension
What is KeyShare?
KeyShare is Chaster extension for transferring partial control over the lock using shared links.
KeyShare link grants limited control over chastity device lock. This isn't unlimited power - everything you can do is pre-defined and bounded by the person who created the link.
KeyShare can be used as a more powerful shared links for public use or for sharing the link in private with "secondary" key holders.
See Quick Start.
TL;DR
- Keyholder prepares the mandate (what can be done to the lock)
- Wearer can accept or decline the mandate
- Keyholder mints the signed mandate into a shareable link
- Keyholder shares the link with one or more people (mandatees)
- Mandatee(s) uses mandate's powers to control the wearer's lock
In case of self lock, the mandate has to be prepared in the lock configuration stage only and it can be minted into a link by the wearer. This extension is more suitable for keyholded locks, but brings some interesting possibilities to self locks too - aka "shared-links on steroids."
Overview
The extension works through a Mandate system - a document that defines exactly what actions a third party can perform and within what limits. Once a mandate is accepted by the wearer, it can be "minted" into shareable links that allow others to exercise the defined powers.
Key Concepts
- Mandate: The authorization document defining scope and limits
- Powers: Groups of actions that can be performed (e.g., "Punish", "Reward")
- Actions: Individual operations like adding time, freezing, etc.
- Minting: Converting an accepted mandate into a shareable link
- Mandatee: The person using a shared link to control the lock
Mandate Import/Export
KeyShare allows you to save mandates to your computer for backup, reuse, or sharing with others. This feature is particularly useful for creating mandate templates that can be applied across multiple lock sessions or shared with the community.
During the configuration phase, both import and export functions are available. You can import previously saved mandates to quickly set up new sessions, or export your carefully crafted mandates for future use. The import function adds the mandate to your configuration, where you can further customize it before the lock session begins.
For running lock sessions, keyholders can export active mandates directly from the keyholder dashboard, and wearers in self-locks have the same capability (if the mandate details are visible to them). This allows you to preserve successful mandate configurations for reuse in future sessions. Exported mandates retain all their settings, powers, actions, and limits exactly as configured.
For Keyholders
Creating a Mandate
As a keyholder, you create mandates to delegate specific control over your wearer's lock:
- Draft the Mandate: Define the name, description, and scope
- Configure Settings: Control what information is visible to mandatees
- Set Limits: Establish maximum bounds (time limits, daily action limits)
- Define Powers: Create capability bundles with specific actions
- Send to Wearer: The wearer must accept before the mandate becomes active
Mandate Settings
| Setting | Description |
|---|---|
| Visible to Wearer | Whether the wearer can see this mandate details |
| Visible to Mandatee | Whether mandatees can see mandate details |
| Show Wearer Details | Display wearer information to mandatees |
| Show Keyholder Details | Display keyholder information to mandatees |
| Show Lock Information | Display lock status and time information to the mandatee |
| Display Duration of the Lock | Display information how long the lock is locked |
| Hidden Timer Not Visible to Mandatee | Do not show the timer to mandatee when it is hidden for wearer |
| Wearer Can See Limits Used | Allow wearer to see how much of the mandate limits have been used (time added/removed, powers per day) |
| Wearer Can See Power Usage Log | Allow wearer to see the activity log of powers used through this mandate |
| Automatic Power Disable | Powers with actions that have no effect will be automatically disabled (e.g., freeze on already frozen lock) |
| Do Not Show Disabled Powers | Hide disabled powers from the mandatee |
| Wearer Can Mint Links | Allow wearer to create shared links (auto-enabled for self-locks) |
| Require Chaster Account for Mandatee | Mandatees must have a registered Chaster account to use this mandate |
| Exclude Wearer | Prevent the wearer from using their own mandate links (requires Chaster account setting) |
| Exclude New Users | Prevent newly registered Chaster accounts from using this mandate (requires Chaster account setting) |
| Show Mandatee Name to Wearer | Controls whether the wearer can see the Chaster username of the person using mandate powers (Always Show Name / Never Show Name / Mandatee Decides) |
Chaster Account Requirements
The account requirement settings provide additional security and control over who can use your mandates. For detailed information about how Chaster account integration works, including OAuth and manual registration options, see Chaster Account Integration.
Global Limits
Global limits act as upper bounds for all actions within the mandate:
- Maximum Time Added: Cap on total time that can be added to the lock (does not reset daily)
- Maximum Time Removed: Cap on total time that can be removed from the lock (does not reset daily)
- Maximum Powers Per Day: Limit how many powers can be executed daily across all users
- Maximum Powers Per Chaster User Per Day: Limit how many powers each individual Chaster user can execute daily
Per-User vs Global Limits
The global daily power limit applies to all mandate usage combined, while the per-user limit restricts individual Chaster users. Both limits are enforced independently - a user can be blocked by either their personal daily limit OR the global daily limit being reached.
Per-User Limit Requirements
The "Maximum Powers Per Chaster User Per Day" setting only applies when "Require Chaster Account for Mandatee" is enabled. Anonymous users cannot be individually tracked for per-user limits.
Remaining Time Based Actions Exception
Actions that work on remaining time (such as doubling, halving, or proportional removal) are not subject to the time addition/removal limits, as they operate on the current lock duration rather than adding or removing specific time amounts.
Pillory Time Exception
Time added from pillory does not count toward global time limits. Pillory is a separate Chaster feature that adds its own time independently of the mandate, so these additions does not count towards mandate's time restrictions.
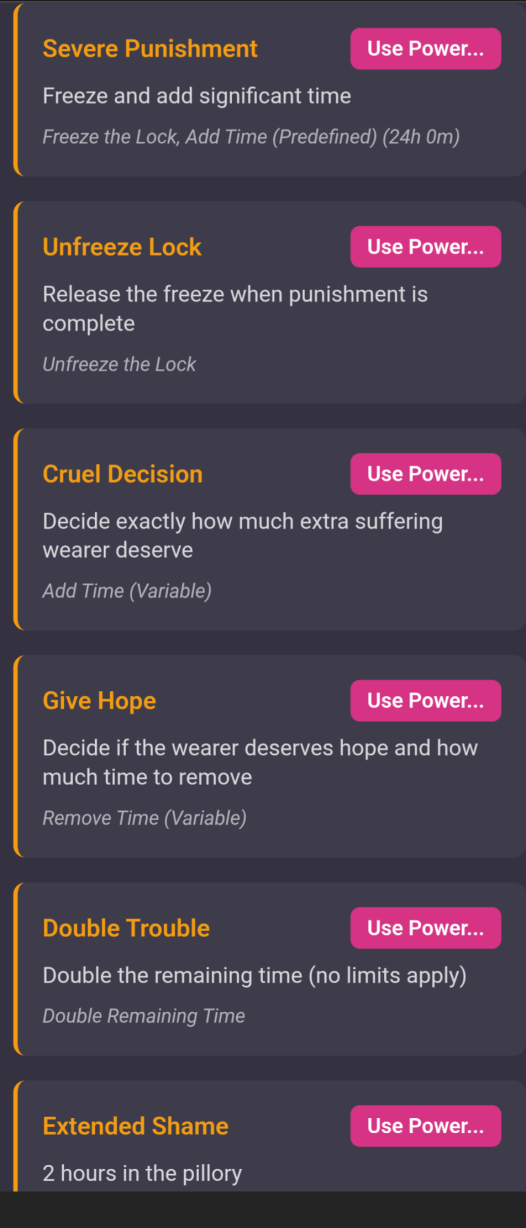
Powers and Actions
Powers are capability bundles that group related actions together. When a power is executed, all its actions are performed as a single operation.
Available Actions
Actions come in two types: Fixed (predefined parameters) and Variable (mandatee chooses parameters).
| Action | Type | Description | Parameters |
|---|---|---|---|
| Add Time (Fixed) | Fixed | Increases lock duration by a predefined amount | Time amount (set in mandate) |
| Add Time (Variable) | Variable | Allows mandatee to choose how much time to add | Time amount (chosen by mandatee within limits) |
| Remove Time (Fixed) | Fixed | Decreases lock duration by a predefined amount | Time amount (set in mandate) |
| Remove Time (Variable) | Variable | Allows mandatee to choose how much time to remove | Time amount (chosen by mandatee within limits) |
| Freeze | Fixed | Pauses the lock countdown indefinitely | None |
| Unfreeze | Fixed | Resumes the lock countdown | None |
| Toggle Freeze | Fixed | Toggles between frozen and unfrozen state | None |
| Show Timer | Fixed | Makes the lock timer visible to the wearer | None |
| Hide Timer | Fixed | Hides the lock timer from the wearer | None |
| Show Timer (Temporary) | Fixed | Shows timer for a predefined duration | Duration (set in mandate) |
| Show Timer (Temporary Variable) | Variable | Allows mandatee to choose how long to show timer | Duration (chosen by mandatee) |
| Hide Timer (Temporary) | Fixed | Hides timer for a predefined duration | Duration (set in mandate) |
| Hide Timer (Temporary Variable) | Variable | Allows mandatee to choose how long to hide timer | Duration (chosen by mandatee) |
| Toggle Timer | Fixed | Toggles timer visibility | None |
| Block Unlocking | Fixed | Prevents unlock even when timer reaches zero | None |
| Allow Unlocking | Fixed | Allows unlock when timer reaches zero | None (only affects KeyShare blocking) |
| Block Unlocking (Temporary) | Fixed | Blocks unlocking for a predefined duration | Duration (set in mandate) |
| Allow Unlocking (Temporary) | Fixed | Allows unlocking for a predefined duration | Duration (set in mandate) |
| Block Unlocking (Temporary Variable) | Variable | Allows mandatee to choose how long to block unlocking | Duration (chosen by mandatee) |
| Allow Unlocking (Temporary Variable) | Variable | Allows mandatee to choose how long to allow unlocking | Duration (chosen by mandatee) |
| Freeze (Temporary) | Fixed | Freezes lock for a predefined duration | Duration (set in mandate) |
| Unfreeze (Temporary) | Fixed | Unfreezes lock for a predefined duration | Duration (set in mandate) |
| Freeze (Temporary Variable) | Variable | Allows mandatee to choose how long to freeze | Duration (chosen by mandatee) |
| Unfreeze (Temporary Variable) | Variable | Allows mandatee to choose how long to unfreeze | Duration (chosen by mandatee) |
| Double Remaining Time | Fixed | Doubles the current remaining time | None (not subject to global limits) |
| Half Remaining Time | Fixed | Reduces remaining time by half | None (not subject to global limits) |
| Remove All Remaining | Fixed | Removes all remaining time, ending the session | None (not subject to global limits) |
| Pillory (Fixed) | Fixed | Sends wearer to pillory for predefined duration | Duration (set in mandate), (time added through pillory is not subject to global limits) |
| Pillory (Variable) | Variable | Allows mandatee to choose pillory duration | Duration (chosen by mandatee within limits), (time added through pillory is not subject to global limits) |
| Start Habit Timer | Fixed | Starts timer for time-based habit completion | Habit selection (predefined habit codes) |
| Cancel Habit Timer | Fixed | Cancels active timer for time-based habit | Habit selection (predefined habit codes) |
| Record Habit Completed | Fixed | Marks habit as completed for tracking | Habit selection (predefined habit codes - both timed and recurring) |
Fixed vs Variable Actions
- Fixed Actions: All parameters are predefined in the mandate. When executed, they perform exactly as configured with no user input required.
- Variable Actions: Allow the mandatee to specify parameters (like time amounts) within the limits set by the mandate. These actions will prompt for input before execution.
Unlock Blocking Behavior
The "Allow Unlocking" and "Block Unlocking" actions only control KeyShare's contribution to unlock prevention. Other Chaster extensions or lock features may independently block unlocking even when KeyShare allows it. The lock can only be unlocked when ALL blocking conditions from all sources are cleared. Additionally, if any power goals are configured, they operate independently of mandatee-submitted blocks - all configured goals must be met in addition to the current mandatee blocking state.
Action Limits
Fixed and variable time actions are subject to global limits. If a power tries to exceed these limits, it will be constrained accordingly. However, remaining time actions (double, half, remove all) and pillory actions bypass these limits - remaining time actions because they work proportionally, and pillory actions because they use Chaster's separate pillory system.
Power Disabling
KeyShare provides sophisticated power disabling capabilities that allow keyholders to automatically disable powers based on the current state of the lock. This helps prevent ineffective actions and creates more dynamic control scenarios.
Automatic Power Disable
When the "Automatic Power Disable" mandate setting is enabled, powers with actions that would have no effect are automatically disabled. For example, a "Freeze" action would be disabled if the lock is already frozen.
Manual Disable Conditions
Keyholders can configure specific conditions under which each power should be disabled. These conditions are set per-power through the power's advanced options (⚙️ button).
Lock State Conditions
| Condition | Description |
|---|---|
| Disable when lock is frozen | Power cannot be used when the lock timer is frozen |
| Disable when lock is not frozen | Power can only be used when the lock timer is frozen |
| Disable when unlock is blocked | Power cannot be used when unlock is prevented by extensions |
| Disable when unlock is not blocked | Power can only be used when unlock is prevented by extensions |
| Disable when timer is hidden | Power cannot be used when the lock timer is hidden from wearer |
| Disable when timer is visible | Power can only be used when the lock timer is visible to wearer |
Time-Based Conditions
Powers can be disabled based on remaining time or total locked time:
| Condition | Description |
|---|---|
| Disable if remaining time below | Power cannot be used when remaining lock time is below the specified threshold |
| Disable if remaining time above | Power cannot be used when remaining lock time is above the specified threshold |
| Disable if locked time below | Power cannot be used when total locked time is below the specified threshold |
| Disable if locked time above | Power cannot be used when total locked time is above the specified threshold |
Visibility Controls
The "Do Not Show Disabled Powers" mandate setting controls whether disabled powers are visible to mandatees:
- Enabled: Disabled powers are completely hidden from the mandatee interface
- Disabled: Disabled powers are shown but greyed out with explanatory text
Power Limits
In addition to disable conditions, keyholders can configure usage limits for individual powers. Limits provide fine-grained control over how often powers can be used.
Limit Configuration
Each limit can specify:
- Per-User Limit: Maximum uses per individual Chaster user
- Shared/Global Limit: Maximum uses across all users combined
- Goal Limit: Required number of uses before the lock can be unlocked (works independently of blocking)
- Reset Mode: When and how the limit counters reset
Reset Modes
| Reset Mode | Description |
|---|---|
| No Reset | Limit never resets during the lock session |
| Hourly | Resets at the start of each hour |
| Daily | Resets at the start of each day (midnight) |
| Weekly | Resets at the start of each week |
| Monthly | Resets at the start of each month |
| Yearly | Resets at the start of each year |
| Timed Interval | Resets after a specified duration (e.g., every 6 hours) |
| Cooldown | Resets after a specified duration from last use |
Limit Examples
Example 1: Daily Punishment Limit - Limit name: "Daily Punishment" - Per-user: 2 uses - Shared: 10 uses - Reset: Daily - Result: Each user can punish twice per day, with a maximum of 10 total punishments across all users
Example 2: Unlock Goal - Limit name: "Votes Required" - Goal: 100 uses - Per-user: unlimited - Reset: No reset - Result: The power must be used 100 times before the lock can be unlocked, regardless of who uses it
Example 3: Cooldown-Based Reward - Limit name: "Mercy Cooldown" - Per-user: 1 use - Reset: Cooldown (24 hours) - Result: Each user can use the reward once, then must wait 24 hours from their last use before using it again
Combining Conditions and Limits
Disable conditions and limits work together to create sophisticated control scenarios. A power is disabled when ANY of the following are true:
- A disable condition is met (e.g., lock is frozen when "disable if frozen" is set)
- A limit has been reached (per-user or global)
- Automatic power disable is enabled and the action would have no effect
- Global mandate limits have been exhausted
Strategic Use of Power Disabling
- Use state conditions to create context-appropriate powers (e.g., "Emergency Unfreeze" only works when frozen)
- Use time conditions to create progressive control (e.g., harsh punishments only available after 1 week)
- Use per-user limits to prevent spam while allowing broad participation
- Use goal limits to create unlock requirements independent of time (e.g., "must earn 50 rewards to unlock")
- Combine cooldowns with per-user limits to pace interactions over time
Link Management and Control
Once mandates are minted into shareable links, keyholders maintain control over these links.
Usage Monitoring and Limits
KeyShare provides comprehensive monitoring of mandate usage through the limits dialog, accessible via the "📊 Limits" button next to each link. This feature allows keyholders (and wearers with appropriate permissions) to track:
Global Usage Tracking
- Time Added/Removed: Total time modifications made through the mandate
- Daily Powers Used: Number of powers executed in the current 24-hour period
- Reset Countdown: Time remaining until daily limits reset
Per-User Usage Tracking
When "Require Chaster Account" and "Maximum Powers Per Chaster User Per Day" are both enabled, the limits dialog also displays:
- Individual User Activity: Each Chaster user's daily power usage count
- User-Specific Progress: Visual indicators showing each user's progress toward their daily limit
- Anonymous vs Identified Usage: Clear distinction between tracked users and anonymous usage
Visibility Controls
The "Wearer Can See Limits Used" setting in mandate configuration controls whether wearers can view usage information:
- Enabled: Wearers can click the "📊 Limits" button to see full usage statistics
- Disabled: The limits button is hidden from wearers, maintaining privacy
- Keyholder Access: Keyholders always have access to view limits regardless of this setting
This monitoring system helps keyholders maintain oversight of delegated control while providing transparency when desired.
User Access Control
KeyShare provides fine-grained access control through whitelist and blacklist systems that work alongside the Chaster account requirements. This allows keyholders to precisely control who can use their shared links.
Whitelist System
The whitelist defines users who are explicitly allowed to use a link:
- Empty Whitelist: When no users are on the whitelist, anyone who meets the basic mandate requirements (Chaster account, not excluded, etc.) can use the link
- Non-Empty Whitelist: When one or more users are added to the whitelist, only those users can use the link (in addition to meeting other requirements)
- Additive Control: Use whitelists to grant access to specific trusted users while excluding everyone else
Blacklist System
The blacklist defines users who are explicitly denied access to a link:
- Explicit Denial: Users on the blacklist are prevented from using the link regardless of other permissions
- Override Protection: Blacklisted users cannot use the link even if they would otherwise be allowed
Priority and Interaction Rules
When both whitelist and blacklist are used together:
- Blacklist Takes Priority: If a user appears on both the whitelist and blacklist, they will be blocked from using the link
- Combined Filtering: For a user to access a link, they must:
- Meet basic mandate requirements (Chaster account if required, not excluded, etc.)
- Either be on the whitelist (if whitelist is not empty) OR not be explicitly excluded by an empty whitelist
- NOT be on the blacklist
Access Control Examples
Example 1: Open Access - Whitelist: Empty - Blacklist: Empty - Result: Anyone with a Chaster account can use the link
Example 2: Exclusive Access - Whitelist: ["alice", "bob", "charlie"] - Blacklist: Empty - Result: Only alice, bob, and charlie can use the link
Example 3: Open with Exceptions - Whitelist: Empty - Blacklist: ["troublemaker", "untrusted"] - Result: Anyone with a Chaster account can use the link except troublemaker and untrusted
Example 4: Controlled with Override - Whitelist: ["alice", "bob", "charlie"] - Blacklist: ["bob"] - Result: Only alice and charlie can use the link (bob is blocked despite being whitelisted)
Managing User Access
Keyholders can manage user access through the link management interface:
- Access the User Management: Click the "👥 Users" button next to any link (only visible when "Require Chaster Account" is enabled)
- Switch Between Lists: Use tabs to toggle between "✅ Allowed Users" (whitelist) and "🚫 Blocked Users" (blacklist)
- Add Users: Enter Chaster usernames to add them to the selected list
- Remove Users: Click the delete button next to any username to remove them
Strategic Use of Access Controls
- Whitelist: Best for exclusive access scenarios where you want to limit usage to specific trusted individuals
- Blacklist: Best for open access scenarios where you want to exclude specific problematic users
- Combined: Use both when you need fine-grained control, but remember blacklist always wins conflicts
User Access Visibility
The "👥 Users" button and access control features are only available when the mandate has "Require Chaster Account" enabled. Links without Chaster account requirements cannot use user-specific access controls.
Link Disabling
Keyholders have the ability to disable any links they have minted through the keyholder dashboard. This is a critical safety feature designed to protect against unintended link sharing or abuse.
When to Disable Links
- Link Compromise: If a link has been shared more widely than intended
- Unwanted Distribution: If the link appears in public forums or inappropriate contexts
- Trust Breakdown: If the intended recipient is no longer trusted with the delegated power
- Mandate Evolution: When you want to phase out an old mandate version in favor of a new one
- Emergency Control: When immediate revocation of delegated power is necessary
How Link Disabling Works
- Immediate Effect: Disabled links stop working immediately for all future access attempts
- Graceful Degradation: Users attempting to access disabled links receive a clear message explaining the link is no longer active
- Reversible: Links can be re-enabled by the keyholder if circumstances change
Self-Lock Considerations
For self-locks, link disabling works differently due to the nature of self-imposed restrictions:
- Wearer Cannot Disable: The wearer cannot disable their own links even if the wearer minting is allowed, as this would defeat the purpose of the self-lock mechanism
- Admin Override: Extension administrators can disable links for self-locks if there are legitimate concerns about misuse or technical issues. Chaster administrators can disable the KeyShare extension as whole.
- Safety Mechanism: This prevents wearers from circumventing their own self-imposed restrictions while maintaining emergency controls
Self-Lock Link Protection
In self-locks, the inability to disable your own links is intentional and protects the integrity of your self-imposed restrictions. Extension administrators and/or Chaster administrators can intervene in cases of genuine emergency or technical problems.
Orphaned Links
When mandates are modified or removed, existing links become "orphaned" but continue to function with the original mandate's powers and limitations. These orphaned links can still be disabled by keyholders through the management interface.
Link Deletion
In addition to disabling links, keyholders can permanently delete links through the keyholder dashboard. Unlike disabling, deletion is irreversible and immediately removes the link from the system.
When to Delete Links
- Housekeeping: Cleaning up old, unused links to maintain an organized dashboard
- Orphaned Links: Removing links from outdated mandate versions that are no longer needed
- Permanent Removal: When you're certain a link will never be needed again
Deletion vs Disabling
| Feature | Disable | Delete |
|---|---|---|
| Reversible | Yes, can be re-enabled | No, permanent removal |
| Link Visibility | Remains in dashboard | Completely removed |
| Use Case | Temporary deactivation | Permanent cleanup |
How Link Deletion Works
- Permanent Action: Deleted links are immediately and permanently removed from the system
- No Recovery: Once deleted, a link cannot be restored or re-enabled
- Clean Removal: The link ID becomes completely invalid and will show an error if accessed
Deletion is Permanent
Unlike disabling, link deletion cannot be undone. The link and all its access settings (whitelist, blacklist, publication status) are permanently removed. Consider using the disable feature instead if you might want to re-enable the link later.
Housekeeping Best Practice
Use deletion primarily for cleaning up old orphaned or unused links. For active sessions where you might change your mind, use the disable feature instead.
Link Switching and Mandate Versioning
KeyShare provides a link switching feature that allows keyholders to update the mandate associated with a link without changing the link URL itself. This is particularly useful for evolving mandates or adjusting power parameters while maintaining the same shareable link.
The Link Switching Process
When a mandate is modified or a new version is created, existing links using the old mandate become "orphaned" - they continue to work with the original mandate's powers and limitations, but the link's mandate is no longer in the lock configuration. The keyholder can then seamlessly switch these orphaned links to a new mandate version (or different mandate completely).
Step 1: Create New Mandate Version
The keyholder creates a new version of the mandate with updated powers, limits, or settings. It's recommended to update the mandate description to reflect the version (e.g., "Control Mandate v2", "Control Mandate v3").
- The old link continues working normally with the original mandate
- The link appears in the "Orphaned Links" section since its mandate is no longer in the lock configuration
- No functionality is lost during this period
Step 2: Wearer Accepts New Mandate
The new mandate must be signed and accepted by the wearer before it can be used for link switching:
- Standard Process: The wearer reviews and accepts the new mandate through the wearer dashboard
- Delegated Signing: If the wearer has delegated mandate signing authority to the keyholder, the keyholder can sign on their behalf
Only accepted (signed) mandates are available for link switching.
Step 3: Switch the Link
Once the new mandate is accepted, the keyholder can switch the orphaned link:
- Navigate to the "Orphaned Links" section in the keyholder dashboard
- Locate the link to be updated
- Click the "🔄 Switch Mandate" button next to the link
- Select the new mandate version from the list of available accepted mandates
- Confirm the switch
Step 4: Seamless Transition
The link is immediately updated to use the new mandate:
- The link URL remains unchanged
- All access settings (whitelist, blacklist, enabled/disabled status) are removed
- Mandatees can continue using the same link with the new powers and limits
- All usage limits and goals are reset to zero
Important Considerations
Limits Reset on Switch
When a link is switched to a new mandate, all usage tracking is reset, including:
- Time added/removed counters
- Daily power usage counts
- Per-user power usage counts
- Goal progress for all powers
- Custom power limit counters
- Cooldown timers
This reset ensures clean tracking with the new mandate's configuration, but any progress toward goals in the old mandate will be lost.
Random Mandate Rotation
KeyShare provides a Random Mandate Rotation system that allows keyholders to publish their wearer's links to a rotating pool of publicly available mandates. This creates a "discovery" experience where mandatees can browse through random links and exercise powers without needing to manually hunt for new links.
How Random Rotation Works
The Random Mandate Rotation operates like a continuous feed of control opportunities:
- Publication: Keyholders publish their wearer's link to the "Random Public Links" group through the link management interface
- Discovery: Mandatees can access the rotation from any mandate page via the "🎲 Random Mandate" button in the footer
- Browsing: Each click loads a random link from the published pool
- Interaction: Mandatees can immediately see and use the available powers
- Next: Click "Random Mandate" again to move to the next random link
This creates a seamless, continuous browsing experience similar to social media feed scrolling, where mandatees can quickly explore different control scenarios and exercise powers across multiple locks.
Publishing Links to Random Rotation
For Keyholders:
To publish a link to the Random Mandate Rotation:
- Navigate to your Keyholder Dashboard → Mandates tab
- Find the mandate with the link you want to publish
- Click the "📢 Publish" button next to the link
- In the publication dialog, check the "Random Public Links" option
- Click "Close" to save
The link is now part of the public rotation and can be discovered by any mandatee using the Random Mandate feature.
Unpublishing:
To remove a link from the rotation:
- Click the "📢 Publish" button next to the link again
- Uncheck the "Random Public Links" option
- Click "Close" to save
The link is immediately removed from the rotation pool.
For Mandatees: Using Random Rotation
As a mandatee, you can explore the Random Mandate Rotation from any mandate page:
- Access: Look for the "🎲 Random Mandate" button in the footer of any mandate page
- Browse: Click the button to load a random published link
- Review: See the mandate details, available powers, and any usage restrictions
- Act: Use any available powers just like with a regular shared link
- Next: Click "🎲 Random Mandate" again to load another random link
- Repeat: Continue browsing through the rotation as desired
Strategic Use of Random Rotation
Maximizing Exposure
The Random Mandate Rotation is ideal for keyholders who want maximum exposure for their wearer's links. It's particularly effective for:
- Public Play: Locks intended for broad community interaction
- Discovery: Finding new mandatees without direct sharing
- High Volume: Links designed to handle many different users
- Experimentation: Testing mandate configurations with diverse users
Privacy Considerations
Links published to the Random Rotation are publicly accessible to anyone using the feature. Ensure your mandate settings appropriately control:
- What information is visible to mandatees
- Whether wearer/keyholder details are shown
- Whether lock information is displayed
- Usage limits and restrictions
Habit/Penalties System
KeyShare integrates with Chaster's habit/penalties tracking system, allowing mandatees to interact with predefined habits according the wearers actions. This enables creative control scenarios where mandatees can start challenges, track completions, or manage recurring tasks.
Habit Types
There are two types of habits supported:
- Timed Habits (Challenges) - These are time-sensitive tasks that must be completed within a specific timeframe:
- Recurring Habits (Routines) - These are tasks that must be performed a certain number of times within a period:
Habit Naming Convention
KeyShare uses a dual alphabetic naming system to distinguish between different habit types while maintaining clarity and avoiding confusion:
Timed Habits (Challenges): Use the NATO phonetic alphabet - Alpha, Bravo, Charlie, Delta, Echo, Foxtrot...
Recurring Habits (Routines): Use Greek letters
- Omega, Sigma, Phi, Lambda, Gamma, Theta...
Why This Naming System?
Chaster requires habit definitions per extension, not per session. This makes creating session-specific habit names impossible. For that reason, KeyShare has predefined habits with generic names that can be easily remembered.
While the habit names are predefined and cannot be changed, keyholders can assign custom descriptions to explain what each habit represents in their specific session configuration. For example:
- Challenge Alpha might mean "Clean the house within 2 hours"
- Routine Omega might mean "Send a tribute photo"
- Challenge Bravo might mean "Complete workout under 45 minutes"
- Routine Sigma might mean "Write in journal"
These descriptions are configured in the extension settings and are displayed to both wearers and mandatees (even when other details are hidden) to provide context for the abstract habit codes.
The habit/penalties system can then be configured to penalize the wearer for failing to complete timed habits within the required timeframe or for not achieving the required frequency of recurring habits within the specified period.
Habit Actions in Mandates
Habit-related actions can be included in mandate powers to allow mandatees to:
- Start Habit Timers: Begin countdown for time-based challenge
- Cancel Habit Timers: Stop active timer for challenge
- Record Completions: Mark habit as completed for tracking
The actual habit management (penalties for missed habits, completion tracking, etc.) is handled by Chaster's core penalty system. KeyShare simply provides the interface for delegated control over these actions.
Creative Usage
The generic nature of habit names allows for creative interpretations. The same "Challenge Alpha" could mean completely different things in different relationships, providing flexibility while maintaining a consistent interface.
Rewarding Mandatees for Using Powers
KeyShare supports rewarding mandatees (people who use powers on other wearer's mandates) for their participation. This creates a reciprocal dynamic where both parties can benefit from the interaction.
How It Works
Requirements: 1. Mandatee Must Have KeyShare Active: The mandatee must have the KeyShare extension enabled on their own lock (no active mandate required, just the extension itself) 2. Opt-In Required: The mandatee's lock must be explicitly configured to receive rewards via a checkbox setting in their lock configuration 3. Configured Reward Actions: You must configure which actions will be executed as rewards in your KeyShare extension configuration and/or set the penalties using Chaster penalty system.
Configuration
In the KeyShare extension config, define the reward actions that will be executed on the mandatee's lock when they use powers on your mandates:
- Multiple actions can be combined into a single reward
- Rewards are executed automatically when the mandatee successfully uses a power
Penalty System
Use Chaster's penalty system to penalize mandatees who don't use powers frequently enough. For example, require a minimum number of power uses per day or week, or the mandatee receives penalties on their own lock.
Important Notes
Reward Requirements
- Rewards only work if the mandatee has KeyShare active and the lock has been set to receive rewards
- The mandatee doesn't need any mandates active on their lock to receive rewards
For Wearers
Understanding Mandates
When your keyholder creates a mandate, you'll receive it for review and acceptance. This is a critical decision point as mandate acceptance is irreversible.
Irreversible Acceptance
Once you accept a mandate by signing it, the acceptance cannot be revoked. The signature is tied to the exact version of the mandate - any changes by the keyholder will void your signature and require re-acceptance. However, any shared links that were already minted from the original mandate version will continue to function with the original mandate's powers and limitations until the lock session ends.
The Acceptance Process
When accepting a mandate, the process depends on the visibility settings configured by your keyholder:
For Visible Mandates:
- Review Carefully: Read all mandate details, limits, and powers
- Understand the Scope: Know exactly what powers you're granting
- Check Visibility Settings: Understand what information will be shared
- Sign and Accept: This creates a cryptographic signature of the mandate
- Minting: After acceptance, links can be generated for sharing
For Hidden Mandates:
If your keyholder has set the mandate as not visible to you, you will only see basic information and will be asked to accept without seeing the full details. This requires extreme trust in your keyholder, as you are essentially signing a blank check for whatever powers they have configured.
Hidden Mandate Warning
Only accept hidden mandates from keyholders you trust completely. You will be granting unknown powers with unknown limits to unknown third parties. This should only be done in relationships with established trust and clear communication outside the extension.
Keyholder Trust and KeyShare
In Chaster, wearers can grant "trust" status to their keyholders, which provides additional control capabilities over the lock. Most extensions require this trust relationship due to their potential impact on the lock.
KeyShare is unique in that it does not require keyholder trust to function. This makes it particularly useful for:
- Fine-tuning Control: Adding specific powers to keyholders without full trust
- Gradual Trust Building: Allowing controlled delegation before full trust is established
- Limited Empowerment: Giving keyholders more control than default, but less than full trust
- Structured Relationships: Maintaining defined boundaries while still enabling shared control
This flexibility allows KeyShare to serve as a middle ground between no additional control and full keyholder trust, making it suitable for a wider range of relationship dynamics.
Self-Lock Support
For self-locks, wearers can configure their own mandates. The "Wearer Can Mint Links" setting is automatically enabled for self-locks.
Self-Lock Configuration Timing
For self-locks, mandates must be configured before starting the lock session. Once the lock begins, no modifications to mandates are possible - only acceptance of previously configured mandates. Plan your mandate setup carefully during the configuration phase.
Delegating Mandate Signing to Keyholder
KeyShare provides a feature that allows wearers to delegate the authority to sign (accept) mandates to their keyholder. This is an extremely powerful delegation of control that fundamentally changes how mandates are approved.
What This Delegation Means
When you grant your keyholder the power to sign mandates on your behalf:
- No Review Required: Your keyholder can accept any mandate without your knowledge or approval
- Complete Trust: You are trusting your keyholder to decide what powers can be delegated and to whom
- Simplified Process: Eliminates the need for you to review and accept each mandate individually
- Total Control Transfer: Your keyholder has complete discretion over what third parties can do to your lock
When to Use This Feature
This delegation is appropriate when:
- Absolute Trust: You have complete and unwavering trust in your keyholder's judgment
- Convenience: You want to streamline the mandate acceptance process
- Total Power Exchange: Your dynamic involves complete control transfer to your keyholder
- Time Constraints: You may not always be available to review and accept mandates promptly
Enabling Keyholder Signing Authority
To enable this feature:
- Navigate to your Wearer Dashboard
- Go to the Overview tab
- Enable the checkbox: "Give power to the KeyHolder to sign mandates"
- Read and understand the confirmation dialog carefully
- Confirm your decision
Once enabled, your keyholder can immediately begin signing mandates on your behalf.
Revoking the Authority
You can revoke this authority at any time by:
- Returning to the Wearer Dashboard
- Disabling the "Give power to the KeyHolder to sign mandates" checkbox
However, there are critical limitations to revocation:
Permanence of Signed Mandates
Revoking this authority does NOT invalidate mandates already signed by your keyholder.
- Mandates signed while the authority was active remain valid and enforceable
- Links minted from these mandates continue to function normally
- Only prevents your keyholder from signing new mandates going forward
This means if your keyholder signed a mandate giving broad control to a third party, that control persists even after you revoke the signing authority. You cannot retroactively "un-sign" mandates that were signed on your behalf.
Risks and Considerations
Critical Warnings
This feature carries significant risks:
- Hidden Mandates: Your keyholder can sign mandates you've never seen
- Unknown Third Parties: You may not know who has been granted control over your lock
- Scope Uncertainty: You may not know what powers have been delegated
- Irreversible Delegation: Once signed, mandates cannot be unsigned
- No Notification: You may not be informed when mandates are signed on your behalf
Only enable this feature if you have absolute trust in your keyholder and are comfortable with complete loss of visibility into the mandate acceptance process.
It is not recommended for:
- New or untested relationships
- Situations where you want to maintain awareness of delegated control
- Relationships without established trust and clear communication
- Scenarios where you need to know exactly what powers are being shared
Best Practices
Viewing Active Mandates
Even with keyholder signing authority enabled, you can still view all active mandates in your Wearer Dashboard → Mandates tab. This allows you to monitor what has been signed on your behalf, though you cannot revoke already-accepted mandates. If your keyholder has hidden a mandate details from you, it will still appear in your list of active mandate, but you will only see basic information and not the full details of what powers have been delegated.
Mandate Lifecycle
graph TD
    A[Keyholder Creates Mandate] --> B[Mandate Sent to Wearer]
    B --> C{Wearer Reviews}
    C -->|Accept| D[Wearer Signs Mandate]
    C -->|Reject| E[Mandate Remains Unaccepted]
    D --> F[Mandate Becomes Active]
    F --> G[Links Can Be Minted]
    G --> H[Links Shared with Mandatees]
    H --> I[Mandatees Use Powers]

    J[Keyholder Modifies Mandate] --> K[Signature Voided]
    K --> B
Example Usage Scenarios
1. Full Control Delegation
Scenario: Giving a trusted friend complete control over the lock.
Configuration:
Powers:
  - Full Control:
      Actions:
        - Add Time
        - Remove Time
        - Freeze/Unfreeze
Global Limits:
  - No restrictions
Settings:
  - All information visible
  - Wearer details shown
  - Lock information shown
2. Limited Punishment/Reward System
Scenario: Allowing multiple people to punish or reward with defined values.
Configuration:
Powers:
  - Punishment:
      Actions:
        - Add Time 1 hour
        - Freeze
  - Reward:
      Actions:
        - Remove Time 30 minutes
Global Limits:
  - Max 24 hours added in total
  - Max 4 hours removed in total
  - Max 5 powers per day (global)
  - Max 2 powers per Chaster user per day
Settings:
  - Wearer details shown
  - Lock information shown
  - Actions visible to mandatees
  - Require Chaster Account enabled
  - Wearer can see limits used
3. Anonymous Random Control
Scenario: Giving strangers unpredictable control without revealing what they're doing.
Configuration:
Powers:
  - Mystery Action A:
      Description: "Something will happen..."
      Actions:
        - Add Time (3 hours)
  - Mystery Action B:
      Description: "Something else will happen..."
      Actions:
        - Remove Time (30 minutes)
Global Limits:
  - Max 12 hours added in total
  - Max 1 hour removed in total
Settings:
  - All details hidden from mandatees
  - Actions hidden from mandatees
  - Generic power descriptions only
Anonymous Control Tips
- Use vague power names and descriptions
- Hide action details from mandatees
- Set appropriate global limits for safety
- Consider using powers with multiple conflicting actions
4. High-Traffic Community Control
Scenario: Sharing a link in a public forum with individual user restrictions to prevent spam.
Configuration:
Powers:
  - Community Vote:
      Powers:
        - Add Time (30 minutes)
        - Remove Time (15 minutes)
Global Limits:
  - Max 12 hours added in total
  - Max 2 hours removed in total
  - Max 20 powers per day (global)
  - Max 1 power per Chaster user per day
Settings:
  - Require Chaster Account enabled
  - Exclude new users enabled
  - Wearer details hidden
  - Limits visible to wearer for transparency
Community Control Best Practices
- Use per-user limits to prevent individual spam while allowing broad participation
- Enable "Exclude New Users" to prevent abuse from throwaway accounts
- Consider making limits visible to wearers for transparency in public scenarios
- Set conservative per-user limits (1-3 powers) for public links
Security Considerations
- Cryptographic Signatures: Each mandate acceptance creates a unique cryptographic signature
- Version Control: Any mandate changes void previous signatures
- Audit Trail: All actions performed through links are logged
- Scope Limitation: Mandatees can only perform explicitly granted actions
- Time-bound: Mandates automatically expire when the lock session ends
Best Practices
- Start Conservative: Begin with limited powers and expand based on trust
- Set Appropriate Limits: Use global limits as safety nets
- Review Regularly: Monitor mandate usage and adjust as needed
- Clear Communication: Ensure all parties understand the scope and limits
- Test First: Try mandates with trusted friends before public sharing
Safety First
Always set reasonable global limits even for trusted mandatees. Technical issues or misunderstandings can lead to unintended consequences.
Getting Started
For mandatees receiving links, see the Mandatee Guide for detailed instructions on using shared control links.